| Back to Back Issues Page |
 |
|
Under the Arbor: Issue 20 September 21, 2021 |
Equinox, and Storing the HarvestTomorrow is the vernal equinox, the crossover point where the days start getting shorter and the nights longer. I think of these turning points as good places to end old, less-than-useful habits and start new, more beneficial ones. Harvest is not over yet, but with the equinox, priorities begin to change and energy shifts. Like my plants, it's the time when I start pulling my energy back from growth, and begin the slow, autumnal process of retreating from outward/above-ground activities to inward/below-ground activities. What do I mean by inward activities? Reflection, integration, meditation. Have I set good seeds for next year's growth? What did my garden teach me this year? What will I do differently come spring? Am I remembering to give thanks for the Love that makes all things live and grow? (Or - let's be honest - am I too overwhelmed putting up tomatoes?!!!)
Curing and Storing Winter SquashWinter squash is so-called because it stores into the winter and can get us through what used to be known as "the hunger gap" between growing seasons.Acorn, spaghetti, delicata, pumpkin, Hubbard, buttercup and butternut squashes all are great storage crops. But to store well through fall and into winter, they need to be fully mature when harvested and be properly "cured" before going into storage. To learn how to do that, check out the full article
Curing and Storing Winter Squash.
How to Cure and Store OnionsOnions are similar to winter squash in that they must be "cured" before going into storage. When season's end approaches onions will start to pull their energy back from the green tops into the bulb. As the tops wither, it is time to gently lift them from the soil with a spading fork (careful!), and lay them horizontally on the ground in the sun for 2-3 days.They must stay absolutely dry, so make sure you turn off any irrigation, and bring them in if rain threatens. "Mild" type onions are not good keepers and should be eaten up within a couple (or maybe three) weeks. "Pungent" type onions are, well, LOUDER, and make very good storage onions that will last till early spring if properly cured and stored. The seed packet or a quick Google of your variety should tell you which kind it is if you're not sure. Find out more at Curing and Storing Onions. Storing CarrotsCarrots store the longest if kept at just above 32°F. and about 95% humidity. Most refrigerators are warmer and drier than this, but still do a fair job of storing carrots for 2-3 months if you prep the carrots correctly and provide humidity to keep the carrots from drying out.To prep carrots for longest fridge life, take care when harvesting to do the following: 1) Brush off most of the soil, but do not wash the carrots. A bit of soil helps carrots resist decay 2) Let the carrots dry for a few hours in the sun. No more than half a day, just enough to “seal” the skin 3) Cut the tops off, close to the root 4) Make sure the carrots are dry, and then place them in a plastic bag with some holes punched in it. I put a slightly moistened paper towel in the bottom of the produce drawer, and then put the plastic bag with the carrots in there on top of it. The paper towel acts as a humidor. Keep an eye on the carrots in the bag to make sure that none of them get wet, or the whole batch can spoil in a hurry. To read about other ways to store carrots, including in the ground over the winter, check out the full article
Storing Carrots
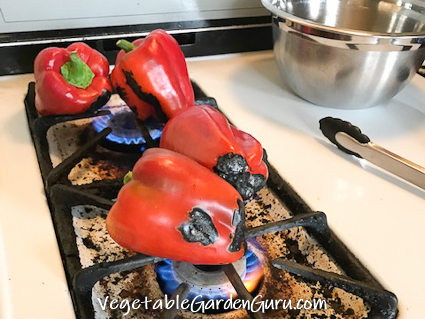
"Storing" Peppers
If you have a gas range or a backyard grill, you can easily fire-roast your own peppers. You don't need a fancy rotating cage like the roadside markets, just an open flame and a pair of tongs. I use the burners on our old gas stove, and just place the peppers right in the flame on top of the burner. At first they make a popping noise, but then they start to blacken, which is what you want. I do 2 or 3 peppers on each of the 4 burners, and keep turning each of them to an unburned side until all sides, the tops and bottoms are blackened. Then I lift them from the burner, put them in a stainless bowl (any glass or metal container with a tight-fitting lid will do), cover them with a lid and let them steam, cool and deflate. Then I peel them under cold running water, which is very easy once they're blackened. The garbage disposal eventually gets to eat the blackened bits and the seed center. I dice the flesh that's left and then pack it in ice cube trays. When frozen I pop out the cubes and pack them together in freezer containers, put 'em back in the freezer and use them as needed. For Tomatoes:Check out my friend Sharon's website. She's the queen of canning, and if you want to put up tomatoes, you can visit the master at: Simply CanningHope you enjoy the fall weather, and have a bountiful and delicious harvest. See you again just before Halloween! 
|
| Back to Back Issues Page |