- Home
- How to Grow Vegetables A-Z
- Growing Artichokes
Growing Artichokes
Artichokes are a “tender perennial” plant, which means that growing artichokes is easiest in climates that do not get a hard freeze in the winter – USDA zones 7-11. While they most appreciate cool summers and mild winters, growing artichokes is also possible in colder, northern climates, if you grow them as annuals from seed planted in the spring.
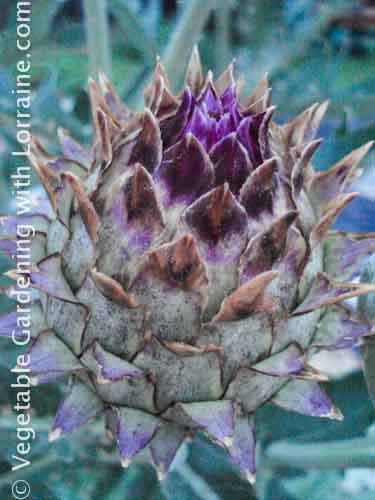
 An Artichoke Beautiful But
Past It's Eating Prime...
Artichokes are in the thistle family, and I think they are stunningly beautiful, especially if you accidentally let them grow too big and start to flower, like the one in the photo. For eating, you need to harvest them while the flower buds are still closed up tight or they will be too tough to eat.
Most people don’t think about growing artichokes when they are first starting a vegetable garden, but artichokes are a fun and easy crop, provided they get what they need: a long enough season, plenty of nutrients and water, and not too much heat.
Best Conditions for Growing Artichokes
With a little planning, you can grow artichokes almost anywhere, but – like people – artichokes do have their preferences. If they had their ‘druthers, artichokes would choose cool summers and non-freezing winters. What they won’t tolerate is unrelenting heat.
Zone 6 and Below: If you’re growing artichokes as an annual and starting them from seed, consider a smaller variety (like Imperial Spring) that has a shorter maturity date. These types only get about 3 feet high and produce 3-4 baseball-sized main flower buds, as well as several smaller ones on offshoots. Even these varieties require a fairly long growing season, 100 or more days.
You can get a jump on the season by starting them indoors in flats under bright lights about 10 weeks before last frost. Plant them out after frost, when the soil has warmed to at least 60 degrees F.
Zone 7 and Above: You can still start artichokes from seed, but you also have the option of growing artichokes from bare root cuttings or plant divides, obtained from a friend or nursery. Plant these in the fall to let the roots get established, and then mulch them really well over the winter.
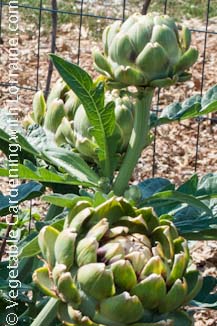
Perhaps the most popular variety is “Green Globe”, which is a beautiful plant that gets – well, huge – maybe 4 tall and up to six feet across. These will have a productive life for 4-6 years.
Soil Preparation for Growing Artichokes
Since artichokes are a perennial, it is especially important to prepare the soil well and make sure that any perennial weed roots are thoroughly removed from the bed before planting. Once artichokes become established you won’t be able to get weed roots out, so do a good job at the outset.
I’m a huge fan of double-digging, which is a great way to prepare the soil for growing artichokes, because it loosens the soil very deeply (making it easy to get all the weed roots out) and also incorporates lots of compost at the same time. Even if you just loosen the soil to a single spade’s depth, weed well and use lots of compost, as artichokes are heavy feeders, and don’t like compacted soil. They like plenty of water, but don’t like to be soggy. I use soil-level drip irrigation, on a timer, so the plants get regular, even watering.
As you plant, add even more high-quality, diverse-ingredient compost, as well as some blood or feather meal (for nitrogen) and some bone meal (for phosphorous). Remember these are perennials so you want to get them off to a good and sustainable start.
Plant bare root artichokes a few inches below the surface, or transplant seedlings with the crown at soil level. Depending on your variety, plant them 2-4 feet apart.
Harvesting Artichokes

Make sure you harvest artichokes before they think about flowering, or they’ll be too tough to eat. Cut them with about a 1 inch “handle” on the stem. Watch for new artichokes coming off side shoots below the main bud. If you miss one, pretend you did it on purpose, let it flower, and then bring it in to use as a centerpiece on the table, perhaps with some purple flower accents.
After the main harvest, if your season is long enough you can try pruning the whole plant down by about a half, which usually stimulates rebudding.
At the end of the season, let the plant take the nutrients back down into the roots, and trim the foliage back after it has turned brown and dead-looking. Mulch the crowns for the winter.
Help share the skills and spread the joy
of organic, nutrient-dense vegetable gardening, and please...
~ Like us on Facebook ~
Thank you... and have fun in your garden!
Affiliate Disclaimer
This website contains affiliate links to a few quality products I can genuinely recommend. I am here to serve you, not to sell you, and I do not write reviews for income or recommend anything I would not use myself. If you make a purchase using an affiliate link here, I may earn a commission but this will not affect your price. My participation in these programs allows me to earn money that helps support this site. If you have comments, questions or concerns about the affiliate or advertising programs, please Contact Me.Contact Us Page


