- Home
- Compost Bins
Compost Bins
Which Should I Buy...
or Should I Build One?
This article reviews all sorts of compost bins, from the in-at-the-top, out-at-the-bottom kind, to compost tumblers, to DIY compost bins. They do not all work the same, and there are advantages and disadvantages to each. Which one you buy (or build) depends on how much space you have, how much compost you want to churn out, how much work you want to put in, and what your budget is.
When you understand the way they work, you will be able to choose the one that will work best for you. (Also be sure to read How to Make Compost for how to make great compost in any bin, without smell.)
 |
 |
 |
  |
  |
  |
Compost Bins Work In One of Two Ways: Batch or Top-to-Bottom
Batch Compost Bins
In batch composting, kitchen scraps and dry leaves are added to a bin until it's full, and then nothing more is added so that it can all finish breaking down, which may take 2-6 months. Batch compost bins are big enough to access with a compost fork so that the contents can be turned and adjusted every few weeks until it's finished. By "adjusted", I mean to re-mix the contents, give it air and spritz some water it if it's too dry. Batch composting is the best way to generate a lot of compost for big gardens, or if you eat a lot of vegetables and want to compost all the scraps.
In batch composting, you ideally need at least 2 compost bins so that one can be active (where you add new stuff) and one can be closed (where nothing new is added so it can finish decomposing). Most wooden bins, non-sloping-side plastic bins and all compost tumblers work this way
Top-to-Bottom Compost Bins
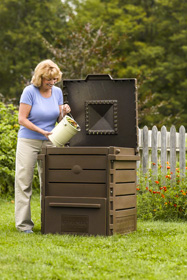
In a top-to-bottom compost bin, kitchen scraps and yard waste are continually added to the top of the bin, and finished compost is scooped out of a little door at the bottom. The new stuff is always on top, pushing the older and more decomposed stuff toward the bottom. Most molded plastic compost bins are designed to work this way - the ones with the sloping sides and the little door at the bottom.
This is a slower process because the contents in the middle of the bin are hard to access for turning and aeration and therefore are slower to break down. These types of compost bins won't make compost quickly, but on the other hand they require almost no effort! Sometimes it takes a year, but the stuff you put in the top will eventually come out the bottom as finished compost. Over time they will make enough compost to supply most patio, container, or other small gardens.
It's important to get the ratio of carbon to nitrogen right in these types of bins, because they don't get turned much as you go along and it's hard to adjust later.
Some large top-to-bottom composters are big enough to get in
there with a compost fork and turn and mix the contents, which I guess
"turns" them into batch composters. But then you need two bins.
How To Use A Top-to-Bottom Bin As Batch Composter
Two people can usually lift a plastic, top-to-bottom style composter up and off the compost, leaving the compost in place on the ground.
If you set the bin down next to the pile, you can then fork the pile back into the bin in its new location. As you do this you can aerate and mix the contents, and can make any adjustments needed to the moisture level or carbon/nitrogen balance. See How to Make Compost for details.
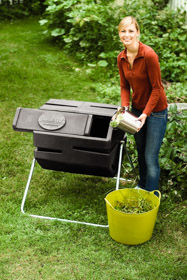
Compost Tumblers
Compost Bins that Spin
Compost tumblers are all batch composters. They are designed to turn and mix the contents, and turn out small batches of compost relatively quickly (weeks to a few months) if the recipe is properly balanced.
Avoid the kind that flip end-for-end! Compost is very heavy, and the strain on the stand when these things flip is intense, almost dangerous. They are very hard to turn if they are more than about a quarter full.
I actually wouldn't recommend any of the large tumblers that are up on a stand, even those that rotate sideways - they are just too heavy to turn when they get much in them. I see many of these "donated" to the community gardens, sitting abandoned off in a corner. The smaller batch ones are fine. There is also a Swedish one that is huge but is fully supported on both sides on geared bearings, and I think that one would be fine.
The two types I do recommend are:
Dual-batch compost tumblers which have two, smaller-volume tumblers side-by-side on the same stand. They have two advantages:
- When one side is about 3/4 full, you can stop adding stuff to it so that it all has a chance to finish breaking down, and start adding the fresh stuff to the other side.
- They are small enough that they never get too heavy to rotate.
Roller compost tumblers sit on a roller on the ground, which supports the weight so that you can really push on them to rotate them. There is no stand to topple over or buckle.
Compost tumblers work well for smaller quantities of compost, and they excel at keeping out even determined dogs, rats and other critters.
|
Advantages
|
Disadvantages
|
Homemade Compost Bins
 |
 |
 |
There are many different designs for these, and I have tried out many of them over the years. Because homemade compost bin designs vary so much, it is hard to write a review of them as a whole. But they all have some advantages and disadvantages in common:
|
Advantages
|
Disadvantages
|
By far and away the best bin I have ever used, of any kind, is the one in the center above, which is made up of 4 stacking tiers. (Free plans here.) These are square frames made of 1" x 6" cedar fencing boards from Home Depot, cut to 28" lengths and held together at the corners by little short 2x4 legs. The legs are 7 1/2" long, and are screwed on so that they are recessed an inch at the top and protrude 2 1/2" at the bottom. The effect of this is that when you stack one tier on top of the next, they nestle onto one another and kind of "lock" together, while leaving a nice 1 1/2" gap between tiers around the sides for good aeration.


The brilliance of this homemade compost bin design is that it is so easy when you go to turn the compost! You simply lift off the top tier and set it on the ground next to the bin and start forking the compost over into it. As the pile gets lower in the original bin, you move over the next tier, and fork some more compost over, and then move the next tier, etc. As the original pile gets lower and lower the new one gets higher and higher, until the whole pile is fluffed and inverted, right next to where you started.
I have two and keep em' crankin' year 'round, one taking the fresh scraps, fall crop residue and leaves (which I store in a separate bin, for mixing with the kitchen scaps), and one closed and 'finishing'. I make a LOT of compost in these. Free Plans Here.
On the homestead in Montana I had 6 of these bins, built of 2x6's, and processed all the food and produce waste from the large local food coop,
The only downside to this design is that dogs, raccoons, mice and yes... the dreaded rat, can get into them. At the university where I taught horticulture, I had to make hardware cloth (1/2" wire mesh) screens to cover them on all sides to keep the varmints out. But on a homestead, you don't really care who shares.
Wire Compost Bins
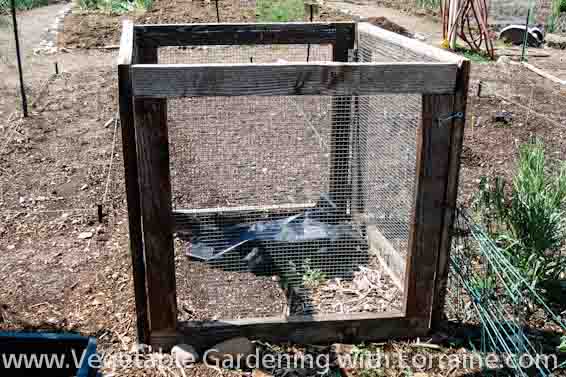
Wire bins are cheap, adaptable, and can work well if modified slightly. If you are going to use it to actually make compost rather than as a leaf storage bin, you need to make them less airy to preserve moisture and nutrients. I have seen them wrapped in plastic, otherwise they are too airy to actually make compost.
There are some square designs on the market with corners that are held together by vertical hingepins, and these work well. I have also made them out of 36" high 2x4" mesh wire (aka "sheep fencing"). Try to avoid 4x4" inch mesh if possible, as the spaces are too big and scraps and leaves will fall out the sides.
The one shown here has a wooden frame, and is hinged on one side for ease of cleaning out the last bit when you get down to the bottom.
Nothing is better than a wire bin for leaves, and it is a great idea to have both a compost bin and a leaf bin. This is so that you have access to a ready supply of high carbon material (leaves) to mix in layers with the high nitrogen kitchen scraps and grass clippings you generate throughout the season.
|
Nothing is better than a wire bin for leaves, and it is a great idea to have both a compost bin and a leaf bin. This is so that you have access to a ready supply of high carbon material (leaves) to mix in layers with the high nitrogen kitchen scraps and grass clippings you generate throughout the season. Advantages
|
Disadvantages
|
Worm Bins
(are not exactly compost bins...)
Worm bins are fun and create awesome nutrient-rich worm castings for your garden. But they work very differently than ordinary compost bins, which can get too hot for worms. Worm bins usually take up very little space, and are especially fun for families with kids (or grownups with a kid inside them)! The worm composting process is covered in more detail in the article on Worm Composting. (I have a Hungry Bin, and I LOVE IT! If you want to help out your soil microbes, then worm castings, or microbial tea made from worm castings, are the BOMB!))
When you have a compost bin on the ground, you may see earthworms come up from below, which they do of their own accord when conditions are just right - plenty of food, not too much nitrogen, and not too hot. This is an excellent and beautiful thing. But I don't recommend buying (or digging up) worms and adding them to your compost bin. The initial bacterial breakdown process gets too hot and will kill them. Like ladybugs in the garden, "If you build it, they will come".
I love making compost as much as I love vegetable gardening. It's all the same thing, really.
As with everything garden, have fun!
Share Your Favorite Compost Bin Design With Us!
Do you have a great compost bin design, or a favorite commercial bin? Share a photo with us, and tell us why you love it.
Help share the skills and spread the joy
of organic, nutrient-dense vegetable gardening, and please...
~ Like us on Facebook ~
Thank you... and have fun in your garden!
Affiliate Disclaimer
This website contains affiliate links to a few quality products I can genuinely recommend. I am here to serve you, not to sell you, and I do not write reviews for income or recommend anything I would not use myself. If you make a purchase using an affiliate link here, I may earn a commission but this will not affect your price. My participation in these programs allows me to earn money that helps support this site. If you have comments, questions or concerns about the affiliate or advertising programs, please Contact Me.Contact Us Page
Check out my FREE
ebook and newsletter!
Stay up-to-date with the best tips and techniques for vegetable gardening in harmony with nature's wisdom.
Click here to read more...
Employee-owned and
committed to pollinators:

I don't have any of those annoying scrolling ads on my site (you're welcome!). Instead I offer relevant links to a few companies and products that I can genuinely recommend. If you buy through these links I earn small commissions that help fund this site, but don't affect your price. Win/win! (And thank you...)
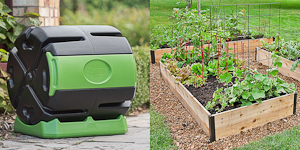
A Few Good Commercial Compost Bin Choices:
Yes, Virginia, I will make a commission! But my recommendations are always motivated by steering my readers toward quality things that work, not by bringing in moolah.
Pyramid Composter
A nice, sturdy top-to-bottom composter, with good capacity.
Dual-Batch
Compost Tumbler
Great for small quantities, with almost no labor! Side-by-side 'active' and 'finishing' bins.
Single-Batch
Compost Tumbler
To make larger quantities of compost, buy two: one for 'active' and one for 'finishing'.
Compost Tumbler
This 37-gallon single batcher can be rolled right over to your garden when the compost is ready!
