- Home
- How to Grow Vegetables A-Z
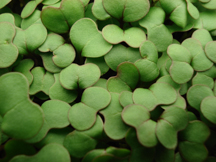
- Growing Microgreens
Growing Microgreens
Growing microgreens at home will allow you to produce an ongoing supply of the tastiest, most nutritious food available anywhere. A recent study* showed that microgreens are between 4 and 40 times more nutritious than the mature plant!
 Sunflower Microgreens |
 Pea Microgreens |
 Cabbage Microgreens |
Growing Microgreens vs. Growing Sprouts
Hundreds of varieties of edible plants can be grown as microgreens.
Microgreens are simply dense plantings of certain garden-variety
vegetables and herbs, harvested when they are very young. The
difference between growing sprouts and growing microgreens is how long
you grow them.
Sprouts are seeds that are germinated in water with no added nutrients, and are eaten just after they have sprouted. You eat the whole thing - root, seed coat and all. Sprouts are nutritious because they have all the goodness that the parent plant put into the seed to ensure its survival and the growth of the next generation. But because you are eating the empty, dead seed coat as well, sprouts are more susceptible to the growth of pathogens.
But if you took those same seeds and instead of germinating them in water, planted them in nutrient-rich soil and allowed them to grow for one to four weeks, they would develop massively higher nutritional levels and be termed "microgreens". They are harvested above the empty seed coat and are less likely to harbor pathogens.
Best Seeds for Growing Microgreens
Many (but not all) common garden-variety seeds can be grown as microgreens. Here is a list of a few of the most popular:
|
|
|
|
Part of the fun of growing microgreens is being able to make custom flavor mixes. Try cabbage, arugula and amaranth as a combo-bite. Play around and create your own faves.
Growing microgreens is very seed-intensive. In other words, if you planted one cabbage seed in the vegetable garden and let it grow to maturity, you'd have three pounds (at least) of cabbage. But when you plant one cabbage seed and harvest it as a microgreen, you get a tiny fraction of an ounce for that one seed. So to get several ounces of microgreens, you have to plant a lot of seeds.
Cotyledons: Not Really Leaves
After a seed germinates, the little “leaves” that first emerge are not really leaves, they are called “cotyledons”. They are a different shape than the true leaves that form later as the little seedling grows, and fall off after their job is done. Microgreens are usually harvested during the cotyledon stage, up to (or a bit after) the time the first true leaves begin to appear.
The cotyledons' job is to gather sunlight and start building the massive amounts of vitamins, antioxidants and phytonutrients that the seedling needs to explode into life.
Growing Microgreens: Not in the Garden
Growing microgreens is done in trays or other shallow containers, indoors under lights, on a sunporch or in a greenhouse. They are too difficult to plant, manage, water and harvest if grown in the vegetable garden.
Because microgreens are so tiny when harvested, they are
planted differently than ordinary garden seeds. When planting seeds in a
garden, you leave enough room around the seed for the plant to reach
full size. In contrast, when growing microgreens in trays the seeds are
planted very close together, almost touching, so that you can gently
grip a handful and harvest many at once, and so that you can minimize
the amount of space and potting mix they will use.
Equipment for Growing Microgreens
You can buy seedling trays at most better nurseries. I use shallow, 1 1/8" deep "germination trays", because they use less potting mix, and for the short time that the microgreens are growing, they don't need deeper soil than this.
But any shallow dish or tray will work. If you're just growing microgreens to harvest for the occasional salad, drainage saucers made for going underneath plant pots work well, as do cafeteria trays. You do not need drainage holes because they are so shallow they dry out quickly.
In my basement I have a bank of steel wire shelf units, the kind that are widely available from Costco or various vendors on Amazon. I hang ordinary fluorescent shop lights on the undersides of the shelves, suspended from S hooks on little chains. The lights shine on the shelf below, and the are adjustable up and down to keep the light just above the growing microgreens (or seedling starts for my veggie garden in the spring).
You can probably grow microgreens in a very sunny window, but because they are planted in very shallow containers, you have to be very careful not to let them dry out. Under lights they stay cool, don't dry out too fast, and get direct overhead light so they grow up straight and don't get spindly.
Planting Instructions for Growing Microgreens
Now because microgreens seeds are planted right next to each other, if you cover them with soil they will push that soil up in a solid mat. There is nowhere for the soil to fall away to because each seed is hemmed in by the seeds around it. This makes it impossible to harvest the microgreens because they are all covered with soil.
For this reason, seeds for growing microgreens are planted on the surface of the soil. To keep them moist until they are fully germinated and have sent roots down into the soil, you need to cover them.
Many growers cover their seeds with paper towels and then water right through the towel. You'll see this is all over the internet. This technique works to keep the seeds moist until they are fully germinated, but there are two big downsides to using paper towels: 1) it often sticks to some of the seeds and pulls them out when you lift it off, and 2) it offers no resistance to the growing shoot. Why is that bad?
A germinating seed always puts the root out first to anchor itself and assure a supply of water. It pushes against the soil above to send its root down.
But when planted on the surface of the soil and covered with paper towel, it has nothing solid to push against and the roots will sprawl around on the surface, unable to gain a purchase. When you remove the paper towel, the surface-exposed roots wither and die.
It may seem counterintuitive, but it works great to place another tray right on top of the seeds. The seeds stay moist, germinate well, and when they sprout they send roots down. As they grow they literally push the top tray right up. When the tray on top of the seeds has been pushed up about 1/4 to 1/2 an inch, I remove it, exposing the seeds to the light.
It is actually good to put some weight in that empty top tray - a brick works great, or fill it with moist potting mix to weight it.
How to Sow Microgreens
When I first started growing microgreens I started with sunflowers and peas. They are big seeds that are easy to work with and they are
delicious. I recommend starting with these.
Because peas and sunnies are so big they will germinate better and faster if you soak them in water for 2-8 hours before sowing.
Other, smaller microgreen seeds do not need to be presoaked before planting, only the big ones. (And never soak arugula or basil seeds, because they are mucilaginous and will stick together, making them impossible to plant).
Don’t let the seeds soak longer than 8 hours or they may drown. Seeds are alive and need air (carbon dioxide) as well as water. When you are ready to plant, drain off the water using a strainer or fine colander and gently pat the seeds dry on a clean cloth or paper towel. They have been activated into the germination process by soaking, but it's harder to evenly spread wet seeds that dry, so give them 10 or 15 minutes to surface-dry on the towel before sowing.
Now set your tray or saucer on a flat, level surface. Pour the potting mix into the tray, and spread it out as evenly as you can. It should be about as moist as a wrung-out sponge. Press it firmly into the edges and corners, and all across the surface. Remove any large chunks in the potting soil that will prevent roots from finding their way down. It is important to get the surface as evenly flat as possible, so that when you shake the seeds onto it, they won’t roll down into any low spots and concentrate there.
Put the soaked seeds back into a dry plastic cup or jar and shake them onto the surface of the soil as evenly as you can. After you've done this you'll notice places where they are too thinly or too thickly planted, and you can use an ordinary dinner fork as a little "rake" to spread them out more evenly.
You will get a better yield and have fewer problems with fungus or poor rooting if you take your time and try to make sure that the seeds are spread out as evenly as possible.
During the
entire time that the seeds are germinating they must stay moist. If they
dry out at this stage they will die. Cover them with an identical tray or saucer, right side up, touching the seeds as described above.
|
Water with a gentle spray nozzle, mister, or watering can with a “rose” spray end. A half-gallon hand-pump sprayer from Home Depot (or elsewhere) works great for watering microgreens at every stage of growth. Don’t drown the seeds, but don’t let them dry out, either. Keep them in a cool place so that they don’t dry out too fast. (They don't need sun until after the cotyledons have opened.) After a couple of days, you will see a white tip emerging from the seed. This is called the radicle, and will become both the root that grows down and the shoot that grows up. It is fun to observe this process closely with a hand lens. |
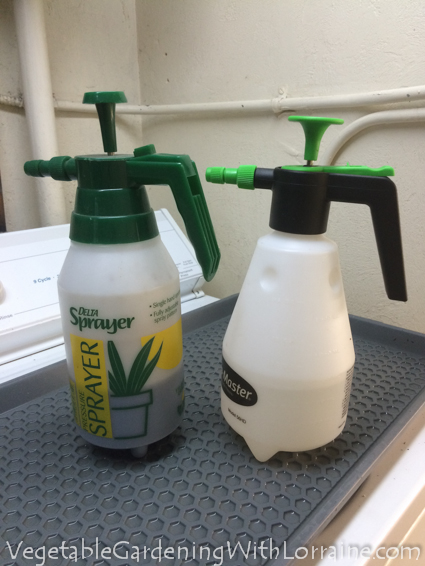 My two hand-pump sprayers, one with water and one with liquid kelp fertilizer. My two hand-pump sprayers, one with water and one with liquid kelp fertilizer. |
(Side note: back when I was a botany major in college we all had to buy a 32 power hand lens, which I still own and cherish to this day. It’s fun to go out to the garden or into a bit of wild nature and spend half an hour carefully examining one square foot of ground with a hand lens. It’s amazing what you will see! But I digress…)
Watering Microgreens
Larger microgreens like sunflower and pea can be gently watered from overhead throughout their grow cycle. Smaller microgreens like amaranth or arugula have tiny filaments for stems and are easily flattened by overhead watering.
I water these smaller microgreens from the bottom by putting about ½” of water in a boot tray and setting the tray of microgreens into the water for about 30 seconds until it soaks up some water from underneath.
(A boot tray is one of those shallow, approximately 15”x28” trays they sell at Home Depot, Lowe’s, and Target for setting your muddy boots in by the front door. They cost about $7-10.)
If you're using saucers, cafeteria trays or other trays that don't have holes in the bottom, pour water into the tray at the edges. You can tilt the tray so that the water runs around a bit on the bottom.
Harvesting Microgreens
Microgreens are ready to harvest when their cotyledons are fully open and have reached a practical size for harvesting. With sunflowers, wait until they have all dropped their black seed coats and the cotyledons are nice and large. With peas, wait until the first true leaves appear and have opened.
If you are harvesting right before you eat them, you can use scissors to harvest. Gently grasp a handful of microgreens and cut them just above the soil surface. Be carefully not to inadvertently pull any up by the roots, or you will get dirt in the mix.
If you are harvesting to eat later, grab a handful of tops and cut the microgreens just above the soil with a very sharp knife. This gives a cleaner cut and the microgreens will last longer in the fridge.
If you wait too long to harvest and the microgreens fully develop their first true leaves, they will start to lose flavor and nutrition and may become stringy or tough.
Enjoy as a topping on salads or soups, in wraps or burritos, as a garnish on top of cold-cut sandwiches or burgers, or as a garnish on fish. Sunflower greens are great in smoothies or whizzed in with guacamole.
Sources:
Microgreen Seeds: MV Seeds (www.mvseeds.com)
Ocean Forest Potting Mix: Check local nurseries or hydroponics stores.
References:
Journal of Agricultural and Food Chemistry, 2012, 60 (31), pp 7644–7651:
Assessment of Vitamin and Carotenoid Concentrations of Emerging Food Products: Edible Microgreens by Zhenlei Xiao, Gene E. Lester, Yaguang Luo, and Qin Wang
http://pubs.acs.org/doi/full/10.1021/jf300459b#showFigures
Help share the skills and spread the joy
of organic, nutrient-dense vegetable gardening, and please...
~ Like us on Facebook ~
Thank you... and have fun in your garden!
Affiliate Disclaimer
This website contains affiliate links to a few quality products I can genuinely recommend. I am here to serve you, not to sell you, and I do not write reviews for income or recommend anything I would not use myself. If you make a purchase using an affiliate link here, I may earn a commission but this will not affect your price. My participation in these programs allows me to earn money that helps support this site. If you have comments, questions or concerns about the affiliate or advertising programs, please Contact Me.Contact Us Page
Check out my FREE
ebook and newsletter!
Stay up-to-date with the best tips and techniques for vegetable gardening in harmony with nature's wisdom.
Click here to read more...
Employee-owned and
committed to pollinators:

I don't have any of those annoying scrolling ads on my site (you're welcome!). Instead I offer relevant links to a few companies and products that I can genuinely recommend. If you buy through these links I earn small commissions that help fund this site, but don't affect your price. Win/win! (And thank you...)