- Home
- Fall Gardening
- Hoop Tunnel
Build a Hoop Tunnel
To Add a Month Onto Each End of Your Growing Season!
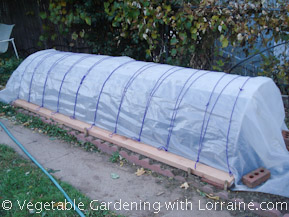
By using a couple of simple, homemade hoop tunnels I have been able to extend my growing season by about a month at each end. These little hoop tunnels are not the big ones that you can walk into like a greenhouse (...wish I had one). The ones I make are wonderful, small, inexpensive, do-it-yourself ones that ordinary gardeners can build anywhere, even in a tiny yard. They just cover a single garden bed, but a lot of growing can happen in there!
This design works better than the PVC-pipe hoop tunnels that are so popular, because the concrete-reinforcing wire supports the plastic all along its length, making it very strong under a heavy snow load.
Fall gardening is very satisfying when you're bringing in armloads of fresh greens and roots long after everyone else has put their garden to bed for the winter. Imagine serving freshly-dug parsnips or carrots as part of your Thanksgiving dinner! For more on planning and planting a fall garden, click on the fall gardening link above.
Here is what you will need to make one, 42” wide x 10’ long hoop tunnel:
Materials Needed
- 1 - 10' x 25' roll heavy 6-mil plastic (you'll only use half of it)
- 3 - 42" x 84" sheets concrete-reinforcing wire (aka "Remesh")**
- 2 - ten-foot long 2x4s (best) OR 1x4s (okay). Cedar will last the longest.
- 16 bricks OR 2 additional ten-foot long 1x4s and a handful of drywall screws
** NOTE: You could, alternatively, buy a big 5'x50’ roll of concrete reinforcing mesh instead of 3 individual sheets, and you would have a ton left over for making lots of hoop tents, as well as a pile of awesome tomato cages, cucumber and bean trellises, squash ladders and leaf bins.
Tools Needed
- Scissors
- Bolt Cutters
NOTE: If you want to use boards instead of bricks to anchor the plastic you’ll also need a screw gun or screwdriver.
Constructing the Hoop Tunnel
The YouTube video shows one very quick and easy way to construct a hoop tunnel. I used Remesh cut off of a 5'x50' roll, but if you buy it by the sheet you'll need 3 sheets. Stand on the long edge of it while pulling it up, to bend it into shape. Be extra careful because the sticking-out ends are sharp, and it can want to spring back. It's easier to bend it with two people.
Since I like to find creative ways to build things as cheaply as possible using whatever might be lying around, I used bricks to hold the narrow plastic anchoring strips down in the video. But I have also used two other ways of anchoring the plastic sheeting so that it can be opened in the day and closed at night:
Another Way #1 is to take an additional 10-foot long 1x4, and after laying the narrow strips over the top of the hoop tunnel, to anchor them down by pinching them between the bottom 2x4 (or 1x4) with a 1x4 on top. To do this, lay the two huge half-sheets of plastic over the wire with about a 4" extra flange laying on the ground on each side (as shown in the video), place the 2x4 on top of it, and then lay a 1x4 on top of that. As you place the narrow plastic anchor strips over the top of the hoop tunnel, lift the top 1x4 up a bit so you can tuck the end of the narrow strip between them, sandwiching it. Drive in a couple of drywall screws at each anchor strip to hold it in place. Don’t snug the anchor strips up too tight over the tunnel, or it will be difficult to pull the plastic sheeting up and down underneath them. You could also use 8 short pieces instead of one long 1x4.
 Center-Opening Hoop Tunnel
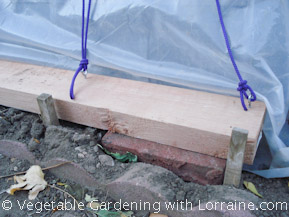
 How the Tie-Downs Are Anchored
Another Way #2 is to do away with the narrow plastic strips over the top altogether, and use some nylon parachute cord instead (bright purple is good! J). The way I did this one year was to put small screw eyes into the 2x4s, at one foot intervals along each side. I alternated the placement of the screw eyes so that they were staggered or offset between one side and the other, rather that straight across from each other. This allowed me to zig-zag the cord back and forth over the top of the tunnel. If you choose this method, know that you don’t have to feed the whole length of cord through every screw eye as you come to it. Just squoonch up a little loop of cord to stick through the screw eye and then tie it off to itself.
After Frost
Another really cool thing you can do with your hoop tunnels is string Christmas lights inside them to add warmth. Use 1, 2, or 3 strings of the big-bulb kind (I think they are 7-watt bulbs) depending on how cold it gets in your area. I put a remote-sensing indoor/outdoor thermometer inside mine so I can monitor the temperature. The intent is to generate heat, not save electricity.
When I taught at Naropa University, we had four 17-foot long hoop tunnels, each with three strings of Christmas lights inside. We only opened the tents a tiny bit for a few minutes each day for some gas exchange (O2 out, CO2 in) and harvesting, and then closed them up tight again. We also covered them with concrete-insulating blankets at night to hold in the warmth. We managed to keep the internal temperature above freezing right up until the end of the semester, just before Christmas, when it was hovering around 0 F at night, and once got to -15. We grew spinach, collards, and mache.
This was a fair bit of work, but it was enjoyable and rewarding to have a garden under the blankets under the snow. Ho Ho Ho!
Help share the skills and spread the joy
of organic, nutrient-dense vegetable gardening, and please...
~ Like us on Facebook ~
Thank you... and have fun in your garden!
Affiliate Disclaimer
This website contains affiliate links to a few quality products I can genuinely recommend. I am here to serve you, not to sell you, and I do not write reviews for income or recommend anything I would not use myself. If you make a purchase using an affiliate link here, I may earn a commission but this will not affect your price. My participation in these programs allows me to earn money that helps support this site. If you have comments, questions or concerns about the affiliate or advertising programs, please Contact Me.Contact Us Page


