- Home
- How to Make Compost
- Homemade Compost Bin
- Compost Bin Plans
Free Compost Bin Plans
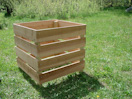
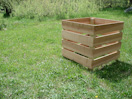
The most beautiful and practical compost bin EVER!
If you'd like to know why the bin made from these compost bin plans works so well, you can visit the homemade compost bin page.
Now let's jump in and get building!

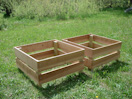
The Best Homemade Compost Bin EVER! in Action:
 |
 |
 |
 |
 |
If you're handy with tools, allow yourself about 3 hours to build this, after you have all your materials and tools together. If you're new to building things from scratch, it might take you half a day.
All the materials are available from Home Depot or any good lumberyard. Prices are volatile so I can't really say how much this will cost, only that the last time I built one it cost about $50. not including the finish.
There are all kinds of compost bin plans on the internet, many using reclaimed material like pallets or stuff you get free on Next Door. I've built many of these, but the bottom line for me is "how well does it work in actual use, when you go to turn and work the compost?" This bin is the hands-down, all-time winner.
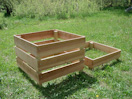
The only compost bin plans you really need are actually contained in the photo below, but don't worry - detailed instructions are provided too. Every corner of each of the four stacking tiers is identical.
 Construction Details: Homemade Compost Bin
Homemade Compost Bin Plans:
Materials Needed
- 8 - 5/8” x 6” x 6’ cedar fence boards from Home Depot (caution: don’t buy the pine ones that are stained and treated to look like cedar, and make sure to pick boards that are flat with no twist or cupping)
- 1 - 1-lb box of #10 x 1 ½” hex/washer self-drilling screws
- 1 - 10’ cedar 2x4
- 1 - quart finish (your choice)
- a bit of any old scrap 2x4 (you only need a few inches)
Homemade Compost Bin Plans:
Tools Needed
- Power drill with nut-driver bit (to fit a #10 screw)
- Hand or power saw (I used a Bosch saber saw - use a circular, table or chop saw if you have it!)
- Measuring tape
- Pencil
- Carpenter's square ("Poly Square" plastic is fantastic!)
Homemade Compost Bin Plans:
Step-by-Step Instructions
1) Cut the fencing cedar into 16 – 28” long pieces.
2) Cut 16 – 7 ½” long pieces from the 2x4 (cut them about a pencil line’s width less than 7 ½”, or you’ll be a quarter of an inch short of lumber when you get to the last one).
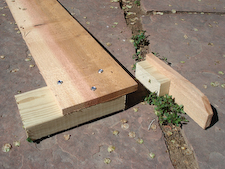
3) Make a little “jig” that will make it easy to evenly space the legs down an inch from the top of the board while attaching them on. To do this, take a scrap of the leftover cedar fence board, and cut it to 6” x 2 ⅛”. Then cut a 1” piece off the end of a scrap of 2x4 (as close to 1” long and as square as you can cut it ), and screw it onto one end of the 6 x 2 ⅛ piece you just cut. The picture below shows the jig on the right. This jig doesn’t get attached to anything – it is just a spacer block so that you can easily screw the legs onto the boards exactly 1” down from the top, quickly and consistently, without having to measure each one each time.
4) You are now going to make 16 identical leg/side board units). Use the little jig to position the leg 1” down from the top of the board, and screw the leg on through the board. Use 3 screws, positioned as shown in the pictures above and on the right below.
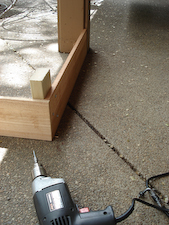
5) Now you’re going to assemble the 16 leg/board units into the four independent tiers that will make up your homemade compost bin. It helps if you have a second pair of hands to help you hold things square and even when you screw the corners together.
Use two (not three) screws on these sides, positioned so that they do not run into the three screws already in place (see outside corner detail photo below).
After two sides are screwed together, the corner should look like this (it's upside down with the leg sticking up):
I didn’t have a second pair of hands, so I laid them out on a flat patio and pressed them up against a roof post so I could put my strength behind the drill to drive the screws.
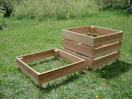
At any rate, when you have 4 of these screwed together at the corners, you have the first tier of the homemade compost bin made. Make three more exactly like it, and you have become the proud owner of your very own…
Best Homemade Compost Bin Ever!
Below is what the outside corner looks like, with and without finish:
 Homemade Compost Bin
with and without Finish
Congratulations! May you enjoy making compost in this for many years, while trillions and trillions of good soil microorganisms help your garden feed you.
If you found the plans for this homemade cedar compost bin useful, you can help others enjoy it too by Liking on Facebook and/or Sharing on Pinterest.
Help share the skills and spread the joy
of organic, nutrient-dense vegetable gardening, and please...
~ Like us on Facebook ~
Thank you... and have fun in your garden!
Affiliate Disclaimer
This website contains affiliate links to a few quality products I can genuinely recommend. I am here to serve you, not to sell you, and I do not write reviews for income or recommend anything I would not use myself. If you make a purchase using an affiliate link here, I may earn a commission but this will not affect your price. My participation in these programs allows me to earn money that helps support this site. If you have comments, questions or concerns about the affiliate or advertising programs, please Contact Me.Contact Us Page
Check out my FREE
ebook and newsletter!
Stay up-to-date with the best tips and techniques for vegetable gardening in harmony with nature's wisdom.
Click here to read more...
Employee-owned and
committed to pollinators:

I don't have any of those annoying scrolling ads on my site (you're welcome!). Instead I offer relevant links to a few companies and products that I can genuinely recommend. If you buy through these links I earn small commissions that help fund this site, but don't affect your price. Win/win! (And thank you...)