- Home
- Vegetable Garden Layout
Vegetable Garden Layout
The vegetable garden layout that will work best for you depends on several factors. You'll need to consider:
- whether you're planning an in-ground, raised bed, or other type of garden
- what you plan to grow
- how much space each specific crop needs
- which areas have all-day sun or partial shade
- how tall you are (seriously? yes!)
- what grew where last year (unless you're a first-time gardener)
 A Carefully-Designed Vegetable Garden Layout
Taking all these factors into consideration at once can be daunting at
first! But I'll make it easy for you by breaking it all down into a step-by-step plan.
Taking time now when doing your layout will make your workload easier
throughout the summer and will increase your yields come fall.
Vegetable Garden Layout Step-by-Step
Step 1: Decide Which Method You'll Use
Your vegetable garden layout is determined in part by which technique you’re going to use. Raised beds are beautiful and are extremely popular, but they have some drawbacks you may not be aware of. Read more at pros and cons of raised bed gardening. There is also a technique called “Square Foot Gardening” and if you're going to do that, buy the book and follow their spacings.
Explore the links above if you are not yet sure which technique you want to use. They each have advantages and disadvantages.
But that "good ol'" rototilled, parallel row garden is largely a thing of the past, because it wastes so much space, destroys the soil ecosystem and creates a hardpan just below the depth of the tines.
After trying out all the methods above and then some, I now garden in 42" wide in-ground beds with 18" wide paths between, that are never tilled or walked on, and are rich, loose and friable after years of compost, appropriate minerals and microbial teas. But any style garden will work provided you care for your soil. (Soil is a living ecosystem, not dead bits of rock.)
Step 2: The Ground Plan
Next draw out your garden space to scale on a sheet of graph paper, or on regular paper with 1-foot marks made with a ruler along the bottom and sides. Mark where the shade is, if any. Remember if you're laying this out before the trees leaf out in the spring, that there may be shade in some places that isn't there now.
Orient your garden beds
so that you can drag a hose up the path between beds, rather than
across a bed. Even if you're going to use drip irrigation or leaky pipe,
there will be times you need to get a hose in there.
Now
you're going to lay out beds and paths on your graph paper, and here's
where how tall you are comes into play. If you're tall you can have
wider beds because you'll be able to reach over further. You need to be
able to reach over to the middle of the bed because of this ironclad
rule: never walk on your beds. It compacts the soil and restricts root growth. So whether raised or in-ground, figure out how far you can reach over comfortably,
and make your bed twice that wide (you'll reach the other side of the
bed from the next path over). I'm 5' 2" and my in-ground beds are 42"
wide. You can generally reach farther over a raised bed than and
in-gound garden.
Over the years I've settled on 18" as my ideal path width. It's wide enough to drag a hose down, but when the tops of the plants invariably hang over the paths, I can still navigate.
I would suggest keeping your garden small and simple if you are just starting out, and avoiding anything fancy like circle gardens or winding paths. They look cool, but its a lot easier to do a vegetable garden layout on paper than it is on the ground. And remember you'll need to drag a hose around and get in there with a wheelbarrow at times.
Step 3: The Plant Plan
On another sheet make a list of everything you plan to grow, and next to that write how many of each plant you think you'll need.
Most homegrown produce gets much bigger than what you buy in the supermarket, so consider that a healthy chard plant will provide many 18-24" long leaves, and one zucchini plant might make four or five squashes a week if you harvest them when little and tender. How much of which vegetables do you eat now? Try to be realistic when allotting precious garden space on your vegetable garden layout.
Spacing
A single carrot plant obviously takes up a lot less garden space than a
single zucchini plant, so knowing proper spacings is very important
when figuring out how many plants to buy from the nursery (or start
ahead of time indoors) or how many seeds to plant.
Next to each
plant write down how much space that plant needs. This is where many
beginning (and not so beginning!) gardeners get tripped up. Follow the recommended plant spacings on your seed packet
or the tag that came with the seedling from the garden center. It's easy to think
"but they're so little, they can't really need that much space!". Oh... but they do! Consider this drawing of a Hubbard squash's roots at 11 weeks old:
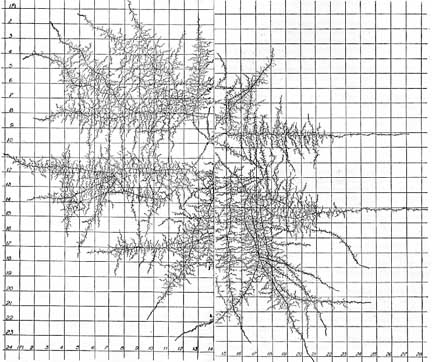
Each square represents one
square foot, so its roots are 28 feet across! (From Root Development of Vegetable Crops by John Weaver, University of Nebraska)
Don't make your crops fight each other for light, soil nutrients or water. Those darling little tomatoes can get to be 8 feet high and 5 feet across, if you happen to like Brandywines.
Now if you're like... well, everybody,
here's where you start to
realize that your garden isn't big enough for everything you drooled
over in those luscious seed catalogs. You're probably going to need to
pare down your dream garden and eliminate some things from your vegetable garden layout plan. But don't be
tempted to cheat on the plant spacings and try to squish things closer
together. It never work outs well in the end.
Hexagonal Spacing
Because
of the old parallel-row paradigm, people think that plants should all
be planted in a straight rows next to each other. But if you offset your
rows, you can fit in a few more plants while still giving each plant its
required spacing:
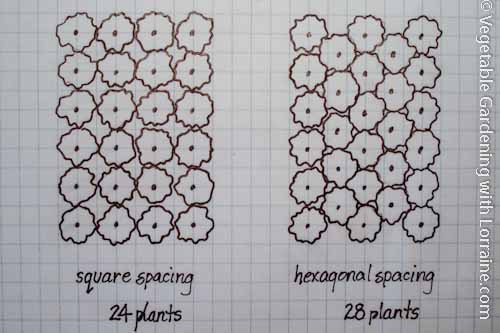
You don't have to do this, of course, but it does "waste" less space.
Sun
Most vegetables need at least 8 hours of full sun a day, and peppers, tomatoes, squashes, herbs and eggplants need full sun all day. If you have areas that only get partial sun or all shade, check out the chart at the bottom that shows the more shade-tolerant vegetables. Note on your plant list any vegetables that will tolerate some shade.
What to Plant Where
Plant your tallest crops, like corn and indeterminate tomatoes, on
the north side of the garden. This will keep them from shading out
smaller plants.
I
like to plant different crops together in the same bed, like carrots
and tomatoes or romaine and spinach. Some plants have other plants they
like or dislike, and taking advantage of this is known as companion planting. Companion planting also confuses the bugs. But if you're just starting out, don't worry about this yet.
Planting the Garden on Paper
Now you can start drawing your plants in on the graph paper as circles, making sure you leave each plant its recommended spacing and its favored sun requirement. You can use a circle template with different sized circles from the art store for this, but you don't need one.
I do my vegetable garden layout with a pencil and paper every spring, with my maps of the last few years' gardens in front of me. If you garden every year it is very important to pay attention to crop rotation when working on the vegetable garden layout because different crops pull different nutrients from the soil, and are affected by different diseases and pests that may linger. But of course if this is your first garden, you don't need to think about crop rotation yet either!
There are computer programs out there that can be fun to use in the middle of winter when you're bored, but again, you don't need them.
They can actually detach you from the thinking part, which detaches you
from your garden. Better to think about and learn what plants need
rather than let a computer plan your garden for you. Having said that, The Old Farmers Almanac offers one here if you want to check it out.
I've gotten now to where I just know how much garden space I will need for the amount of zucchini or collards I want, and leave that much linear space in the garden plan. Then when I actually go out and plant, I follow the recommended plant spacings and stop planting when I've filled the space allotted. I don't have to draw in each individual plant on my vegetable garden layout plan anymore. This is just by way of saying that it does get easier and faster with experience. Provided you do it rather than rely on a computer.
Shade Tolerance Chart
| Veggies Needing Full Sun | Veggies Tolerant of Some Shade |
| Tomatoes | Lettuces |
| Peppers | Swiss Chard |
| Cucumbers | Collards |
| Onions | Radishes |
| Carrots | Peas |
| Corn | Broccoli |
| Squash | Spinach |
| Eggplant | Cauliflower |
| Melons | Beets |
| Most Herbs | Beans |
Step 4: Taking Your Vegetable Garden Layout Outside
 Hexagonal spacing on radishes.
You now need to take your vegetable garden layout off the page and onto the ground. If you're using raised beds you don't need to do this part, because the beds and paths are already defined.
(NOTE: It's easier to do your soil preparation (weeding, cultivating, adding compost and amendments) before you lay out the garden into rows and paths. The amendments you put in where the paths will go are not lost, because roots will grow under your paths too.)
You will need some stakes, some twine and a tape measure to lay out your beds. You can buy 1/4" bamboo stakes from the garden center (but I live in Colorado, and actually, they're much cheaper from the pot-growing supply store, even though no I don't), and saw them into 3' sections. They're useful later for lots of other things in the garden. (Like fencing out the ducks... which is another story,)
Put a stake in one corner of your garden space, and measure out whatever width bed you settled on. Measuring and staking helps to keep your beds even and parallel.
Drive in another stake across of the bed (at 42-60" depending on your reach). Then mark out another 18 inches from there for your path, and drive in another stake. Keep marking this way until all your beds and paths are laid out along one side of the garden. Go to the other side of the garden, and drive in stakes at matching intervals.
Run twine between the stakes down the long edge of the beds, so that you can clearly see where your beds and paths are going to be.
Congratulations, you did it! Next step: Take your paper vegetable garden layout outside, and your seedlings and seeds, and
have fun and get your hands dirty!...
Help share the skills and spread the joy
of organic, nutrient-dense vegetable gardening, and please...
~ Like us on Facebook ~
Thank you... and have fun in your garden!
Affiliate Disclaimer
This website contains affiliate links to a few quality products I can genuinely recommend. I am here to serve you, not to sell you, and I do not write reviews for income or recommend anything I would not use myself. If you make a purchase using an affiliate link here, I may earn a commission but this will not affect your price. My participation in these programs allows me to earn money that helps support this site. If you have comments, questions or concerns about the affiliate or advertising programs, please Contact Me.Contact Us Page
You Are Here: Vegetable Gardening Home > Vegetable Garden Layout
Check out my FREE
ebook and newsletter!
Stay up-to-date with the best tips and techniques for vegetable gardening in harmony with nature's wisdom.
Click here to read more...
Employee-owned and
committed to pollinators:

I don't have any of those annoying scrolling ads on my site (you're welcome!). Instead I offer relevant links to a few companies and products that I can genuinely recommend. If you buy through these links I earn small commissions that help fund this site, but don't affect your price. Win/win! (And thank you...)