- Home
- Vegetable Gardening for Beginners
- Starting a Vegetable Garden
Starting a Vegetable Garden
A Big-Picture Overview of the First Year
If you are a starting a vegetable garden for the first-time, you've come to the right place! There is plenty of guidance here to help you get started on the right foot. This page is a quick, big-picture overview (with links) of some things you'll be doing the first year so you can plan and plant your garden the right way, right from the beginning.
By following the Seven Steps to Starting a Vegetable Garden below you can grow a beautiful vegetable garden - no matter how big or small your space - your very first year.
 Starting a Vegetable Garden Involves Careful Layout and Plant Spacing
Starting a vegetable garden does take some work and investment the first year, but the rewards are so worth it! Once you start caring for little plants, watching them grow, knowing that they are going to provide you and your family with the healthiest, tastiest food possible... you'll be hooked.
So jump in! And be sure to check out these other articles that are especially helpful for beginners: Vegetable Garden Layout and Vegetable Gardening Tips.
Seven Steps to Starting A Vegetable Garden
Step One: Planning and Layout

Don't skip this step! Starting a vegetable garden begins indoors, with a piece of paper and a pencil. (There are fancy programs out there to help you make a beautiful plan, but truthfully you don't need them.) Think about your outdoor space, and choose an area that gets at least 8 hours of full sun a day. There is a whole article about Planning a Vegetable Garden that covers this in more detail.
You may be tempted to do a fancy vegetable garden layout like circle beds or a keyhole garden, but for your first year I would recommend starting simply with one or two wide in-ground beds or raised beds, which are very popular. If you have only a patio or balcony, then container vegetable gardening is for you!
Some plants need full sun all day, and some tolerate a little shade. Look at the chart in the vegetable garden layout article that shows which is which, and draw your plan accordingly.
Narrow row gardening has pretty much become a thing of the past now, because wide beds are a much more efficient use of space and water. Draw out on paper where your bed(s) will go, with each bed being 3 or 4 feet wide so you can reach to the middle without stepping on the bed. If you're making more than one bed, give yourself an 18 inch wide path in between for walking and wheelbarrow access.
And a serious suggestion: start small - you'll be much more satisfied with a small garden that is well cared-for and weeded, than a big tilled plot full of weeds in August. Expand or do fancy shaped beds next year. Keep it simple at first.
Now decide what you want to grow. When starting a vegetable garden for the first time, grow only what you most love to eat, and focus on crops that are more expensive to buy from the store, like tomatoes, peppers, basil, lettuces, green beans and Swiss chard. Onions and potatoes are relatively cheap to buy, so don’t use up garden space on them your first year. Grow them when you have some experience and want to expand your garden. Also, if you want to grow corn, know that it takes a lot of space because it needs a pretty big patch, maybe 10' square, to get sufficient pollination for good, full ears.
Next you need to figure out your average last frost date, which you can get from your local State Extension Service website, or a good local nursery. This is very important because you must know when it is safe to plant seeds or seedlings in your area. You don't want to lose your new seedlings to frost.
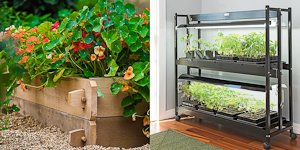
The last thing you need to decide is whether you will be starting a vegetable garden from seed, or from seedlings purchased from a nursery or garden center. I usually do both: I start most things from seeds started ahead of time in seed flats, but I also sometimes buy a few nice big tomato plants to put in after the last frost date. Seed packets will tell you how many weeks ahead to start seeds indoors in seed flats, if you want to get a jump on the season.
And... if you want to keep your vegetable garden producing past the frost date in the fall, read the Fall Gardening and Building a Hoop Tunnel articles so that you can plant at the right time.
Step Two: Soil Preparation
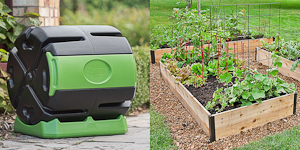
Now it's time to decide if you want to build a raised bed vegetable garden, or just grow vegetables the in the ground. There are pros and cons to each. Raised beds can also be really beautiful and are hugely popular, so if you decide to build one, check out the raised bed vegetable garden section of this site, which is extensive and which has been written to support you in bringing forth the most nutritious food possible from a raised bed garden.
If you’re going to plant in the earth, soil preparation is usually the hardest part of starting a vegetable garden. A lot of people buy or rent a rototiller for the job, but rototilling creates a hardpan below the depth of the tiller, and damages soil structure and soil ecology. However, many people like rototillers because they are relatively fast. So I say, better to use a tiller than not to garden at all, but rent one and after your first year never use one again... they really do more harm than good if you are caring for your soil properly.
I started vegetable gardening using French intensive, double-dug raised beds. I dug my garden space up by hand with a good garden spade and digging fork, incorporating lots of homemade compost at the same time. Every couple of years I would “double-dig” the bed down about 16 inches deep while incorporating more compost. In the alternate years I used a broadfork to aerate and loosen the soil, which was much faster than double-digging. But after several years my soil became so loose and friable that now it never needs to be dug at all! The earthworms, fungi, actinomycetes, and good microbes do all the work for me. Take care of the soil biology, and it will take care of you.
If you're growing in the earth, make sure your ground has a little moisture in it before you try to dig or till it up, especially if it is currently lawn or an area that has had a lot of foot traffic. If it is baked, dry or full of weeds, begin by watering your space deeply for an hour or two, 24 to 36 hours before digging. Don't till in weeds, especially quackgrass or orchard grass, but rather fork them out. Every bit of broken root left behind will sprout a new chunk of grass.
If you're starting a vegetable garden for the first time, chances are you don't have any homemade compost yet, so you will have to go buy some to amend your soil. As you are forking and spading up your garden soil (or rototilling it), mix in as much compost as you can afford. This will work wonders for keeping your soil loose and friable, keeping the soil ecology healthy, and therefore keeping your plants and you healthy!
Step Three: Planting
Once your garden bed or beds are loosened, weeded, and amended with compost, you are ready to plant. If you are planting seeds, pay close attention to the recommended seed depth and seed spacing on the packet. If you are planting seedlings from the nursery, the plant tag should have recommended plant spacing printed on it.
Here's a big mistake to avoid when starting a vegetable garden for the first time: planting those teeny plants closer together because you have so much empty ground to fill. That tiny tomato start may get to be 4 feet across and 6 feet high by August, so give it the recommended space that it needs. Proper plant spacing will also make it easier to access at harvest time.
Plant your tallest crops toward the north side of the garden so that they don't shade smaller crops (the south side if you live in the Southern hemisphere). Put tomato cages over your tomato plants while they're still fairly small, and help them grow up into the cages so they receive good support when they start to bear big, heavy tomatoes. See the article on growing tomatoes for recommendations on making your own tomato cages that are much sturdier than the hardware-store kind.
Step Four: Watering
Be careful here! If your garden is not on automatic watering, be sure to keep a close eye on it, especially at first. Use a good, heavy-duty oscillating sprinkler, and make sure you don’t let your newly planted garden get dry. Water in the evening when it is cool, to minimize evaporation, and later in the season, to avoid plant diseases like powdery mildew or early blight.
If a seed swells and starts to sprout, but then dries out, it will die. When first starting a vegetable garden, this is a critical thing to watch, or else you can lose a lot of work. This is the number one reason for "poor germination" in carrots. They are so tiny they germinate, but they dry out. One of my local farmer friends lost a huge crop of carefully, hand-transplanted lettuces last year because her crew didn't water deeply enough the next day.
Step Five: Weeding
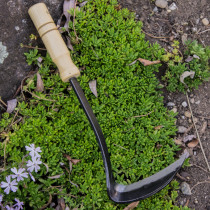
Weeds are much easier to deal with when they are very little. My favorite tool for this job is a little Japanese weeding sickle called a nejiri kama that you pull toward you about a quarter inch underneath the soil surface to cleanly cut off the weeds at the root. But if you catch weeds when they're little enough, any sort of scuffling up the surface of the soil will knock the little weeds down.
Make sure you don't inadvertently weed out your crop plants! Wait until your seedlings are big enough to clearly discern from the weeds before you start weeding. Make weeding a twice a week meditation (I do it a bit daily), rather than a half-day weekend chore. This routine also helps you make a relationship with your garden.
Starting a vegetable garden is easy, but truly making a relationship with it takes time, a certain slowing-down and, well, noticing. You’ll just have to take my word for this, but when it happens for you, you'll understand what I mean.
Step Six: Dealing with Problems
I have found that plant pest problems are, unfortunately, usually worse when you are first starting a vegetable garden than after one has been established for awhile. This is because the soil is usually not as rich and healthy as it will be after a few years of love, compost, and minerals and therefore the plants are more vulnerable. After a few years of being fed wholesome homemade compost and appropriate minerals, your soil ecology will be thriving, and your plants will be strong and healthy, and therefore not as attractive to plant pests.
Watch carefully, especially when your plants are little, for signs of insect damage: little holes chewed in the leaves, tiny black bugs crawling around, etc. (Those would be flea beetles, see the plant pests article.) Use a natural insecticide such as soap spray (recipe in the plant pests article) or neem oil if necessary, but work on building up your soil health and overall garden health by planting small-headed flowers around to attract beneficial insects, confusing plant pests by mixing different crops in one bed (like spinach and lettuce, or tomatoes and carrots), and learning to make compost and using lots of it.
Step Six: Starting Your Compost Pile

Beginners usually discount this step, but it is most important! Growing vegetables is only half of an equation - "growing" compost for your soil is the other half. Vegetables take nutrients out of the soil, and composting puts some nutrients back in, but more importantly it feeds the soil microbes that serve up minerals to the plants, like a high-class waiter. Don't rely on chemical fertilizers to do the job. But do remineralize with natural minerals, according to what your soil needs.
Using chemical fertilizers without compost is a bit like eating only donuts, and then taking vitamins to fool yourself into thinking that you're getting what your body needs. You may get your daily allowance of vitamin C, but you won't be healthy.
For a simple compost operation you can start a pile of kitchen scraps in the corner of your yard, mixed with some fall leaves, grass clippings and coffee grounds from your local bistro. But it will be more attractive and efficient if you use a compost bin, provided you turn it once in awhile to aerate it. You can build your own homemade compost bin or buy a black plastic one, but whichever way you choose, start making food for your garden now.
Step Seven: Harvesting
Peas, spinach, radishes and lettuce are usually the first things you can start harvesting from your garden. I like to just take a few leaves from the outsides of my lettuces and spinaches, and let them keep growing from the middle. Other people like to harvest the whole thing and plant another in its place. And another way is to cut the whole top off and let the lettuce regrow from the root (but that always seemed a little mean to me!)
With tomatoes, it's a waiting game. They need lots of heat, so it's usually July or August before you start seeing red tomatoes. But then, watch out! All of a sudden you'll have more than you can eat, and so you'll have to share with your neighbors. And believe it or not, those little red plastic thingies that you put around the base of the plants really do speed ripening.
So, that's the basics. Starting a vegetable garden is one of the best things you can do for yourself! (IMHO). And for more information on any specific topic, check out the many articles listed on the left. Many of them branch out into more detailed information.
Now that you know the basics of starting a vegetable garden, I hope you will follow your inspiration and get hooked in one of the most satisfying things a person can do. One of my favorite quotes is from Minnie Aumonier:
"When the world wearies and society ceases to satisfy, there is always the garden."
Amen to that. Blessings on your adventure.
You Are Here: Vegetable Gardening Home > Starting a Vegetable Garden
Help share the skills and spread the joy
of organic, nutrient-dense vegetable gardening, and please...
~ Like us on Facebook ~
Thank you... and have fun in your garden!
Affiliate Disclaimer
This website contains affiliate links to a few quality products I can genuinely recommend. I am here to serve you, not to sell you, and I do not write reviews for income or recommend anything I would not use myself. If you make a purchase using an affiliate link here, I may earn a commission but this will not affect your price. My participation in these programs allows me to earn money that helps support this site. If you have comments, questions or concerns about the affiliate or advertising programs, please Contact Me.Contact Us Page
Check out my FREE
ebook and newsletter!
Stay up-to-date with the best tips and techniques for vegetable gardening in harmony with nature's wisdom.
Click here to read more...
Employee-owned and
committed to pollinators:

"Why try to explain miracles to your kids when
you can just have them plant a garden?"
--- Robert Brault
Raised Bed
These are the most beautiful, easy-to-assemble, best-designed raised beds I've found.


I don't have any of those annoying scrolling ads on my site (you're welcome!). Instead I offer relevant links to a few companies and products that I can genuinely recommend. If you buy through these links I earn small commissions that help fund this site, but don't affect your price. Win/win! (And thank you...)